Spotfire Automation Servcie REST API 사용 가이드
[toc]
1. 클라이언트 등록
1.1 클라이언트 등록
클라이언트 등록을 위해 config 명령을 사용합니다.
config 명령어 위치 : <제품 설치="" 디렉토리="">\tomcat\spotfire-bin
config 명령을 사용하여 아래와 같이 client 를 등록 합니다.
config register-api-client --name="<user-name>" -Sapi.rest.automation-services-job.execute --client-profile=other -Gclient_credentials

Tool password:  # Configuation Tool 사용시 설정한 패스워드 입력
Automation Service 제어를 위해서는 Scpoe 를 api.rest.automation-services-job.execute 로 설정 하는것에 주의 하세요
등록이 완료 되면 아래와 같은 메시지가 출력 됩니다.
Successfully registered a new API client with the display name 'dangtong':
Client ID: 99120668327730d2fef9a81c9469c589.oauth-clients.spotfire.tibco.com
Client secret: 7161dc749c2a0c7baa1436b261533a5a5d65a43040eb094e41ed4afb88539998
To view the full client configuration, please use the 'show-oauth2-client' command.
To get a list of all existing clients, please use the 'list-oauth2-clients' command.
To delete a registered client, please use the 'delete-oauth2-client' command.
위 내용중 client-id , client-secret 은 나중에 사용을 대비해 별도로 잘 기록 해둬야 합니다.
1.2 클라이언트 등록 확인
config 명령을 사용하여 아래와 같이 클라이언트 정상 등록 여부를 확인 합니다. 1.1 에서 출력된
config show-oauth2-client --client-id=<client-id>  --show-client-secret=true

Tool password:   # Configuation Tool 사용시 설정한 패스워드 입력
아래와 같이 등록된 Client 정보를 보여주면 됩니다.
Showing the configuration for the OAuth2 client 'dangtong':
        Creation date: 2020-06-25
        Type: Public API client
        Profile: Other
        Client ID: 83796ebf53b7416babfb1a2d1a1e5304.oauth-clients.spotfire.tibco.com
        Client secret: e06be4af33988c2947e3f2f7b1185b0052a40b59b98b267394d12f4b1ff1cebb
        Authorized scopes: api.rest.automation-services-job.execute # REST API 범위 확인
        Authorized grant types: client_credentials
2. Oauth2 토큰 받기
2.1 기본 정보
- 토큰 받기 Endpoint : http://
: /spotfire/oauth2/token - METHOD : POST
- 요청 Body
| 변수 | 값 |
|---|---|
| grant_type | client_credentials |
| scope | api.rest.automation-services-job.execute |
- 인증 Type : Basic Auth
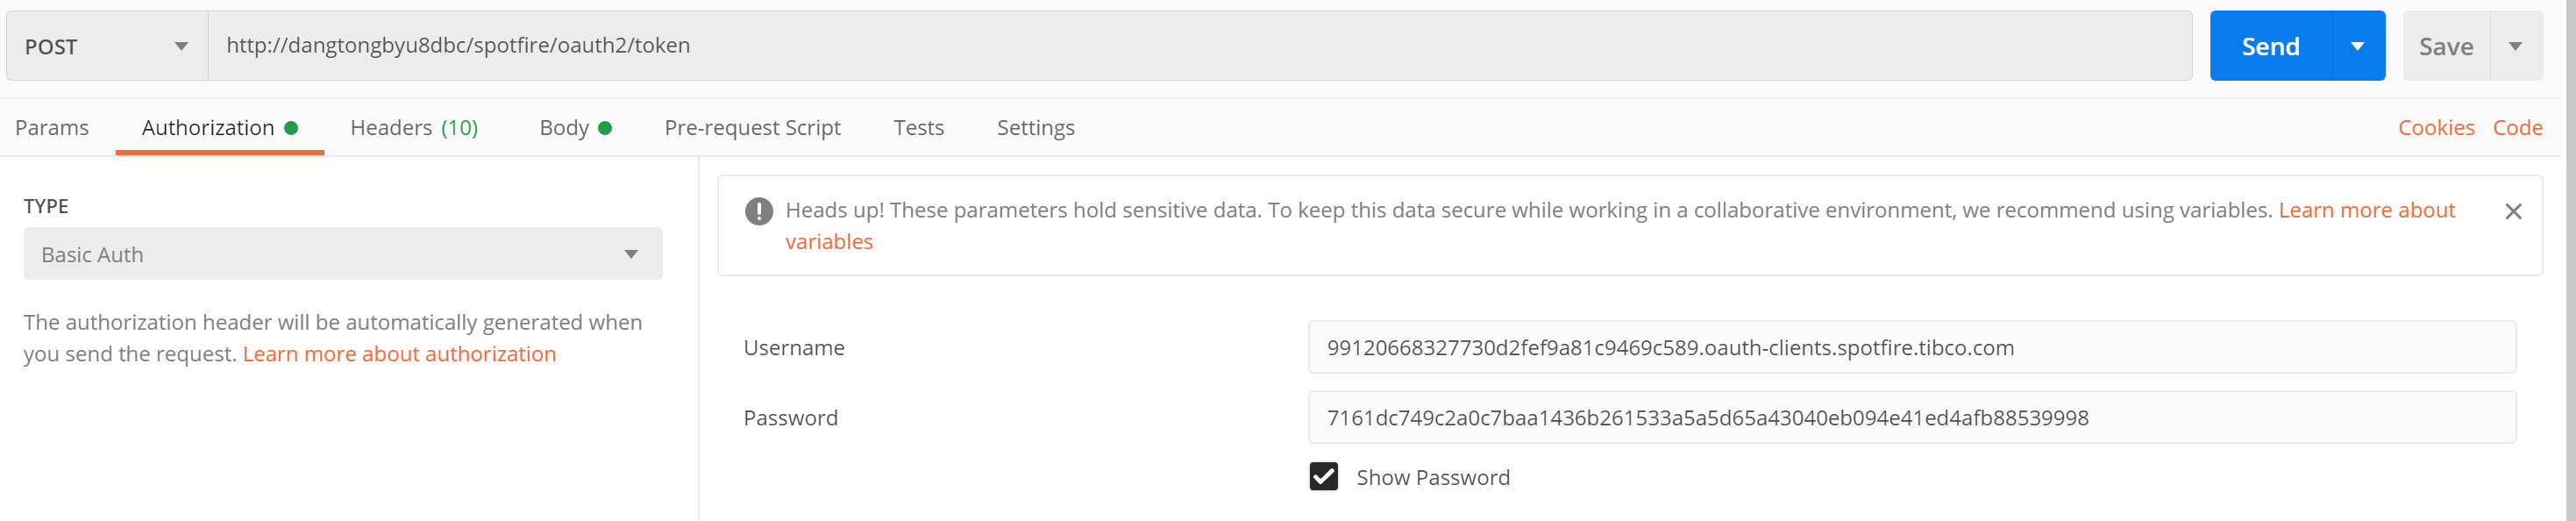
2.2 Postman 사용시 예
- 인증 항목 : client-id 를 username 에 , client-secret 를 Password 항목에 넣어 줍니다.
-
Body Parameter : grant_type , scope 2개의 키를 만들고 값을 각각 넣어 줍니다.
body type은 x-www-form-urlencoded 를 선택합니다.

2.3 Curl 사용시 예
curl -u client_id:client_secret -d "grant_type=client_credentials&scope=api.rest.automation-services-job.execute" -H "Content-Type: application/x-www-form-urlencoded" -X POST http://<host>:<port>/spotfire/oauth2/token

<실제 예>
curl -u 99120668327730d2fef9a81c9469c589.oauth-clients.spotfire.tibco.com:7161dc749c2a0c7baa1436b261533a5a5d65a43040eb094e41ed4afb88539998 -d "grant_type=client_credentials&scope=api.rest.automation-services-job.execute" -H "Content-Type: application/x-www-form-urlencoded" -X POST http://localhost/spotfire/oauth2/token
3. REST API 를 이용하여 명령 수행
명령 수행은 Automation service 작업 조회 해 보는 것으로 하겠습니다.
3.1 기본정보
-
참고 URL : https://docs.tibco.com/pub/spotfire_server/10.10.0/doc/api/TIB_sfire_server_REST_API_Reference/as.html
- Endpoint : http://
: /spotfire/api/ - 서비스 주소 목록
- 작업 상태 조회 : /rest/as/job/status/{job-id} [Method : GET]
- 작업 중단 : /rest/as/job/abort/{jobId} [Method: POST]
- 작업 시작 (XML 이용) : /rest/as/job/start-content [Method: POST]
- 작업 시작 (라이브러리 파일 이용) : /rest/as/job/start-library [Method: POST]
3.2 Postman 사용예
Authorization 을 Bearer Token 으로 설정하고 Token 에 2절에서 받은 Token 값을 그대로 넣어 줍니다.

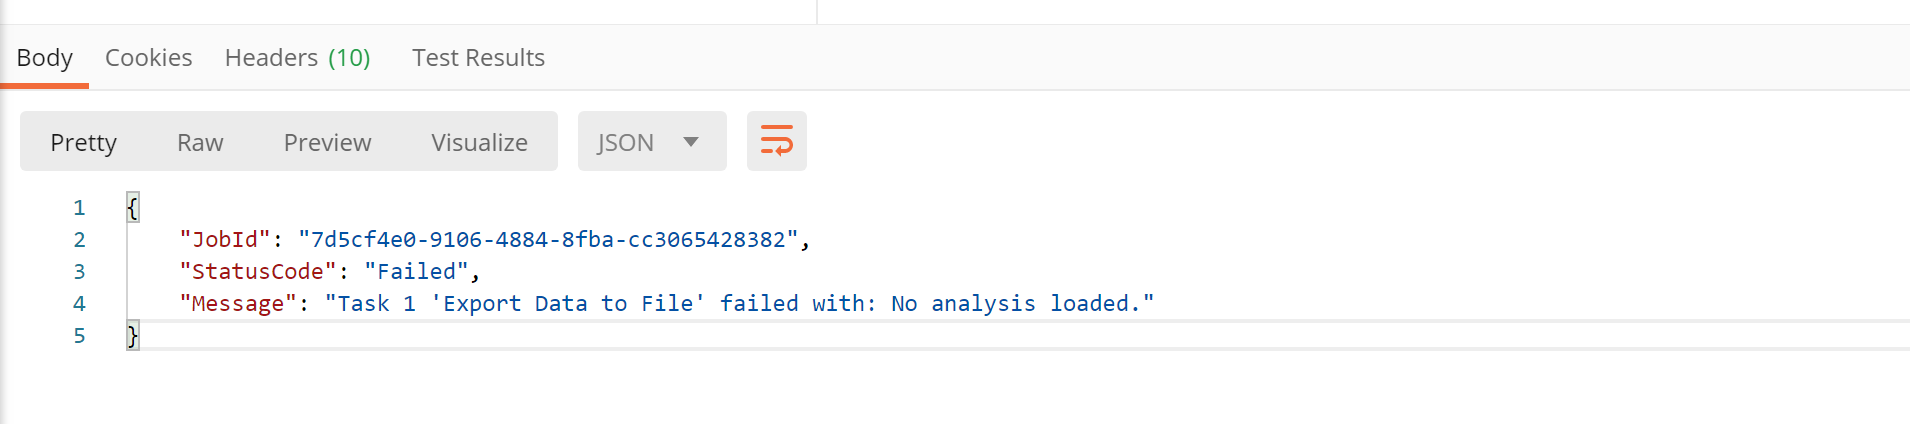
아래와 같이 응답이 나오면 정상 입니다. 아래 응답의 경우 조회한 작업이 실패 상태로 조회 됩니다.
3.3 Curl 사용예
- 사용법 및 사용예
# 사용 방법
curl -X GET 'http://localhost/spotfire/api/rest/as/job/status/<job-id>' -H 'authorization: Bearer <token>'

# 실제 사용 예시
curl -H "Accept: application/json" -H "authorization: Bearer eyJraWQiOiJyLU40MVcwQ0UyR2RSdWFxZDk2UGUzQmlwcVVNX19Nb05uUG1jMkx3RmtVIiwiZW5jIjoiQTEyOEdDTSIsImFsZyI6IlJTQS1PQUVQLTI1NiJ9.HpSsTkPr4P8P2hbAT8ISKGQA2vDg8rEQ9HWgUj9EvNEqwAWRXK-WUCM4HAqhhSuFZT7ZgQ_xdXbEDo5rF0LyHdpEbebKBKXO97GgxxMoYtdu8OOpYTKYw1WWeCiyIhJwlZoqug4xnA9FW4P7-DyFfRx3Nacv02LKH_SKxdU6Hf4FvNR4kBzXWs1V4YQ0lye-FN8OFLPqGmp9D7YbBK7ZEk0K1TFo1pZQjS-3UGkxY2FCNDiGKtUYpN2R7Ezdo2C5C-YfqJFFMTaQhg3Uu9ENj_j3KTFtSObN9VMK5CM0VOLv416c3skNl9ibtjl2OnfUvePj0miqqbNhIkr1evyoRg.DIk2vWrMRRcRV1QI.b2yhTWPE_9oKc5_-rFxzEYWfheiq-NfSHBEIgN7ywyQQ_ov_xcNLvpX7DZy2KPbJAnV9Ss4tAmmpd1f9vTJMZx0LnbZKE-lhczVLVtpWffKRcy2shLobNaX6RGyJ01Jdj39af2kE_S1_AMHKQ161GoyjamytZnxW39NCWoyUGs0CVQ4-d25oPZ7ky7aGjHCb3Ri146HNbs3aEEXFe16UvgrQpBMSW-72HARWmvzwkZGejICzXMTEGq0Rcz_xqyagLT3-xY3Q6rWMjpIfWGnc3xrHR-sgf2aUVxy1-ijTiGdiYI5ezUOj9-AhU7z1Vsd1wko4mfjuv9UKxDvMplHtRZIvsPxumoR7V7e5RGt7sf9cmRpKuMW6hwlPWqbsTnFBtVJ2y5Cfa93KwAywAtZCjUA7sw.qfkFHtTCIccurh0_LRXdwA" http://localhost/spotfire/api/rest/as/job/status/7d5cf4e0-9106-4884-8fba-cc3065428382
- 결과
 http://localhost/spotfire/api/rest/as/job/status/7d5cf4e0-9106-4884-8fba-cc3065428382
{"JobId":"7d5cf4e0-9106-4884-8fba-cc3065428382","StatusCode":"Failed","Message":"Task 1 'Export Data to File' failed with: No analysis loaded."}